Halo 博客添加天气卡片完整教程(Earth 主题 + 高德 API)
本文记录了我在 Halo 2.x 博客中添加实时天气卡片的全过程,包括模块创建、配置注入、样式调整、配额优化及深色模式适配。最终效果:首页展示一张带毛玻璃质感、自动定位城市、支持手动刷新的天气卡片,完美兼容浅色/深色模式。
最终效果
第一步:准备工作
获取高德地图 API Key
天气数据来自高德地图开放 API,需要先申请 Key。
1. 打开 高德开放平台 | 高德地图API ,注册/登录账号。
2. 进入「应用管理」→「我的应用」,点击「创建新应用」。
3. 应用名称随意,类型选择 Web服务。
4. 创建完成后,在应用详情页添加 Key,服务平台必须选「Web服务」(不是 JS API)。
5. 生成 Key 并复制备用。
> 免费配额:每日 5000 次,个人博客完全够用。本文加入了 2 小时缓存,进一步节省调用次数。
获取城市编码(adcode)
高德天气接口需要城市编码而非城市名。常见城市编码:
其他城市可在 相关下载-Web服务 API | 高德地图API 查询。
第二步:创建天气模块
在主题目录下创建 templates/modules/weather.html 文件。如果 modules 文件夹不存在,先新建一个。
将以下完整代码粘贴进去(直接复制全部):
<th:block th:fragment="weather">
  <th:block th:if="${theme.config.weather != null and #strings.isEmpty(theme.config.weather.amap_key) == false}">
    <input type="hidden" id="weather-amap-key" th:value="${theme.config.weather.amap_key}" />
    <input type="hidden" id="weather-city-code" th:value="${theme.config.weather.city_code}" />

    <div id="weather-card"
         class="group relative mb-8 overflow-hidden rounded-xl bg-white/70 backdrop-blur-xl shadow-md transition-all duration-500 hover:shadow-lg dark:border dark:border-slate-700/50 dark:bg-slate-800/80"
         style="display: none; max-width: 100%;">

      <div class="relative p-6 sm:p-8 flex flex-col justify-between" style="min-height: 220px;">
        <div class="flex items-center justify-between">
          <div class="flex items-center gap-2">
            <span id="weather-city" class="ml-2 text-base font-semibold text-gray-700 dark:text-slate-300 tracking-wide">定位中...</span>
            <span class="rounded-full bg-blue-50 px-3 py-0.5 text-xs font-medium text-blue-600 dark:bg-blue-900/40 dark:text-blue-300">#实时气象</span>
          </div>
          <button id="weather-refresh"
                  class="opacity-0 group-hover:opacity-100 transition-opacity duration-300 rounded-full p-1.5 text-gray-400 hover:bg-gray-100 hover:text-gray-600 dark:hover:bg-slate-700 dark:hover:text-slate-200"
                  title="刷新天气" onclick="window.weatherRefresh()">
            <svg class="h-4 w-4" fill="none" viewBox="0 0 24 24" stroke="currentColor">
              <path stroke-linecap="round" stroke-linejoin="round" stroke-width="2" d="M4 4v5h.582m15.356 2A8.001 8.001 0 004.582 9m0 0H9m11 11v-5h-.581m0 0a8.003 8.003 0 01-15.357-2m15.357 2H15" />
            </svg>
          </button>
        </div>

        <div class="mt-5 flex items-start gap-8">
          <div class="flex items-baseline leading-none" style="position: relative; z-index: 10;">
            <span id="weather-temp" style="font-size: 4.5rem !important; line-height: 1;"
                  class="font-bold text-gray-900 dark:text-white tracking-tighter">-</span>
            <span class="text-3xl font-light text-gray-400 dark:text-slate-400 ml-1">°C</span>
          </div>
          <div class="flex flex-col pt-1.5">
            <span id="weather-desc-main" class="text-2xl font-medium text-gray-800 dark:text-slate-200">-</span>
            <span id="weather-desc-sub" class="text-sm text-gray-400 dark:text-slate-500 mt-1">载入气象详情...</span>
          </div>
        </div>

        <div class="mt-5 flex gap-8">
          <div class="flex items-center gap-2 rounded-xl bg-gray-50/80 px-4 py-2 dark:bg-slate-700/50">
            <span class="text-lg">💧</span>
            <div class="flex flex-col">
              <span class="text-[10px] font-semibold uppercase text-gray-400 dark:text-slate-400">湿度</span>
              <span id="weather-humidity" class="text-sm font-medium text-gray-700 dark:text-slate-200">--%</span>
            </div>
          </div>
          <div class="flex items-center gap-2 rounded-xl bg-gray-50/80 px-4 py-2 dark:bg-slate-700/50">
            <span class="text-lg">🌬️</span>
            <div class="flex flex-col">
              <span class="text-[10px] font-semibold uppercase text-gray-400 dark:text-slate-400">风速</span>
              <span id="weather-wind" class="text-sm font-medium text-gray-700 dark:text-slate-200">--</span>
            </div>
          </div>
        </div>

        <div class="mt-5 flex items-center justify-between border-t border-gray-200/60 pt-5 dark:border-slate-700/50">
          <div class="flex items-center gap-2">
            <div class="flex h-8 w-8 items-center justify-center rounded-full bg-blue-50 dark:bg-blue-900/30">
              <span class="text-lg">🌍</span>
            </div>
            <span class="text-sm font-medium text-gray-700 dark:text-slate-300">实时气象站</span>
          </div>
          <span id="weather-time" class="text-xs tabular-nums text-gray-400 dark:text-slate-500">--</span>
        </div>
      </div>

      <div id="weather-icon"
           class="absolute top-12 right-12 text-8xl opacity-10 dark:opacity-10 group-hover:opacity-100 group-hover:grayscale-0 transition-all duration-700 pointer-events-none transform group-hover:scale-110 group-hover:rotate-6"
           style="filter: grayscale(1); z-index: 0;">⌛</div>
    </div>

    <script>
      var amapKeyInput = document.getElementById('weather-amap-key');
      var cityCodeInput = document.getElementById('weather-city-code');
      var amapKey = amapKeyInput ? amapKeyInput.value : '';
      var cityCode = cityCodeInput ? cityCodeInput.value : '440100';
      var card = document.getElementById('weather-card');
      var tempEl = document.getElementById('weather-temp');

      function updateTempColor() {
        if (!tempEl) return;
        var isDark = document.documentElement.classList.contains('dark');
        tempEl.style.color = isDark ? '#ffffff' : '';
      }

      var observer = new MutationObserver(function(mutations) {
        mutations.forEach(function(mutation) {
          if (mutation.attributeName === 'class') {
            updateTempColor();
          }
        });
      });
      observer.observe(document.documentElement, { attributes: true });

      var iconMap = {
        '晴': '☀️', '多云': '⛅', '阴': '☁️', '雨': '🌧️',
        '雷阵雨': '⛈️', '雪': '❄️', '雾': '🌫️'
      };
      var CACHE_KEY = 'sola_weather_cache';
      var CACHE_DURATION = 2 * 60 * 60 * 1000;

      async function fetchWeather() {
        var url = 'https://restapi.amap.com/v3/weather/weatherInfo?city=' + cityCode + '&key=' + amapKey + '&extensions=base';
        var res = await fetch(url);
        var data = await res.json();
        if (data.status === "1" && data.lives && data.lives.length > 0) {
          var live = data.lives[0];
          var cache = { data: live, timestamp: Date.now() };
          localStorage.setItem(CACHE_KEY, JSON.stringify(cache));
          return live;
        }
        throw new Error('天气数据获取失败');
      }

      function renderWeather(live) {
        tempEl.innerText = live.temperature;
        document.getElementById('weather-city').innerText = live.city;
        document.getElementById('weather-desc-main').innerText = live.weather;
        document.getElementById('weather-desc-sub').innerText = '当前湿度 ' + live.humidity + '%,建议适度出行。';
        document.getElementById('weather-humidity').innerText = live.humidity + '%';
        document.getElementById('weather-wind').innerText = live.winddirection + '风 ' + live.windpower + '级';
        document.getElementById('weather-icon').innerText = iconMap[live.weather] || '🌈';

        var d = new Date();
        var dateStr = d.getFullYear() + '-' + String(d.getMonth()+1).padStart(2,'0') + '-' + String(d.getDate()).padStart(2,'0');
        document.getElementById('weather-time').innerText = '发布于 ' + dateStr;

        card.style.display = 'block';
        updateTempColor();

        setTimeout(function() {
          if (tempEl.innerText !== live.temperature) {
            tempEl.innerText = live.temperature;
          }
          updateTempColor();
        }, 150);
      }

      async function loadWeather(forceRefresh) {
        if (!forceRefresh) {
          var cached = localStorage.getItem(CACHE_KEY);
          if (cached) {
            try {
              var parsed = JSON.parse(cached);
              if (Date.now() - parsed.timestamp < CACHE_DURATION) {
                renderWeather(parsed.data);
                return;
              }
            } catch (e) {}
          }
        }
        try {
          var live = await fetchWeather();
          renderWeather(live);
        } catch (err) {
          card.style.display = 'none';
        }
      }

      function startWeather() {
        if (amapKey) {
          if (document.readyState === 'complete' || document.readyState === 'interactive') {
            setTimeout(function() { loadWeather(false); }, 50);
          } else {
            window.addEventListener('load', function() { loadWeather(false); });
          }
        }
      }

      window.weatherRefresh = function() {
        loadWeather(true);
      };

      updateTempColor();
      startWeather();
    </script>
  </th:block>
</th:block>
代码要点说明
第三步:配置主题设置面板
编辑主题根目录下的 settings.yaml,在 spec.forms 末尾添加 weather 配置组(记得保存):
- group: weather
      label: 天气设置
      formSchema:
        - $formkit: text
          name: amap_key
          label: 高德地图 API Key
          help: "填入后前台首页将展示天气卡片,留空则不显示"
        - $formkit: text
          name: city_code
          label: 城市 adcode
          value: "440100"
          help: "高德城市编码,例如 440100 代表广州"
添加后,进入 Halo 后台 → 外观 → 主题 → 详情 → 点击右边的三个点 → 点击主题的「重载主题配置」按钮(或先切换到另一个主题再切回来),使配置生效。
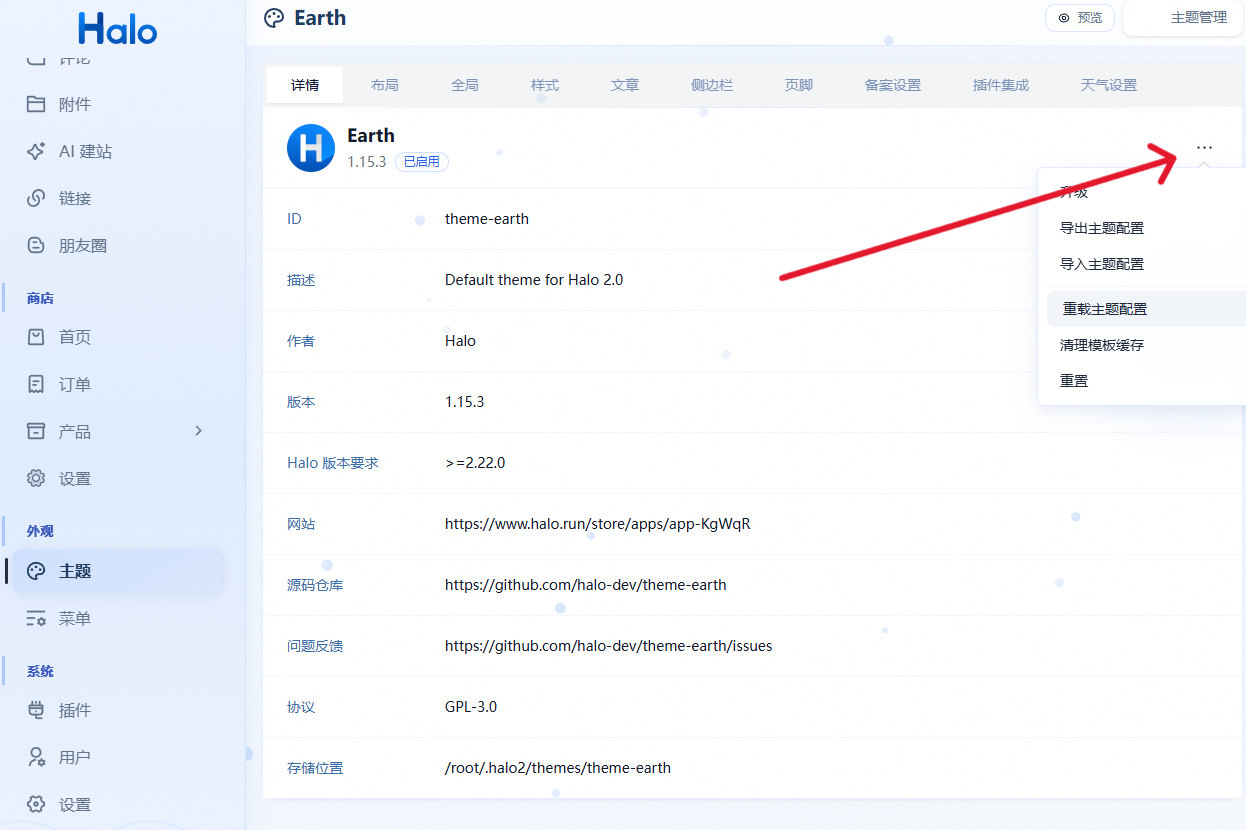
第四步:在首页引入天气模块
找到主题的 templates/index.html 文件,在文章列表上方(通常是 <th:block th:replace="~{modules/category-filter}" /> 附近)插入一行:
<th:block th:replace="~{modules/weather :: weather}" />完整上下文示例:
<section class="mx-auto mt-6 grid max-w-7xl grid-cols-1 gap-6 px-4 md:grid-cols-[1fr_18rem] lg:px-6">
  <div class="z-0 min-w-0">
    <!-- 天气卡片 -->
    <th:block th:replace="~{modules/weather :: weather}" />

    <th:block th:replace="~{modules/category-filter}" />
    <!-- 文章列表 ... -->
  </div>
</section>
第五步:填写配置并测试
1. 进入 Halo 后台 → 外观 → 主题。
2. 找到 「天气设置」 标签页。
3. 在「高德地图 API Key」输入框中粘贴你的 Key。
4. 在「城市 adcode」输入框中填写城市编码(默认广州 440100)。
5. 点击「保存」。
6. 刷新博客首页,天气卡片应该正常显示。
调试方法
按
F12打开控制台,输入:
document.getElementById('weather-card').style.display如果返回 none,说明脚本未执行。
输入:
document.getElementById('weather-amap-key').value清除缓存重新测试:
localStorage.removeItem('sola_weather_cache');
location.reload();
常见问题
1. 温度显示为 "-"或不显示
通常是 Key 为空或类型错误。请确认 Key 类型为 Web服务,且已在后台填写。
2. 深色模式下温度看不清
本代码已用 MutationObserver 监听主题切换,并强制温度文字在暗色模式变为纯白。如果仍然看不清,可在内嵌 CSS 中调整 tempEl.style.color 的值。
3. API 调用次数过多
缓存有效期默认 2 小时,可在 weather.html 中修改 CACHE_DURATION 变量(单位毫秒),例如改为 6 60 60 * 1000(6 小时)。
4. 城市名左偏或右偏
在 weather.html 中找到 id="weather-city" 的 span,调整 ml-2 的值即可ml-0 最左ml-4 更右)。
5. 大号装饰图标 hover 无效
如果发现图标的 font-size 被压缩为 16px,多半是 Tailwind 的 text-8xl 类被覆盖,解决方法是将图标换成 <span> 并用内联样式强制 font-size,如本文最终代码所示。
6. 更新时间不想显示
在内嵌 <style> 中添加 #weather-time { display: none; } 即可隐藏。
可自定义的部分
总结
通过本文的步骤,你可以在 Halo 博客中成功添加一个美观实用的实时天气卡片。整个过程涉及模块化模板创建、Thymeleaf 数据注入、高德 API 调用、前端缓存策略及深色模式适配,是一次完整的 Halo 主题自定义实践。希望它能成为你博客的一个小亮点,欢迎在评论区交流你的效果和改进想法。